How to Use CSS in adoc Studio
Create your own styles with CSS in adoc Studio. This article explains how to locate and edit the product stylesheets.
With product styles, you can tailor the presentation of your documentation to meet your specific needs. Whether corporate design, aesthetic preferences or special layout requirements - with individual styles you have complete control over the appearance of your HTML and PDF documents.
In adoc Studio, you are therefore not limited to the styles supplied. You can also create your own styles.
Basics of the style structure in adoc Studio

Styles in adoc Studio are based on CSS, Cascading Style Sheets. Each style has a so-called base style, which is used as the basis for the design. You can extend or overwrite this basic style with additional styles. This allows you to efficiently reuse and adapt style elements.
Each style consists of several components:
style.css: The main file that defines the appearance.
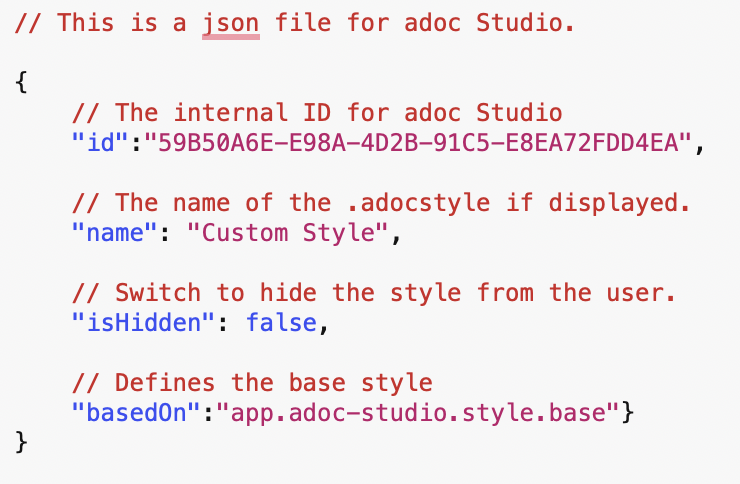
info.json: Contains metadata about the style, such as name, ID and base style.
Resource folder: Additional files such as fonts and images can be stored here

Get to know the existing styles
Before you create your own style, it is helpful to examine the existing adoc Studio styles and understand how they are structured. This will give you a look “behind the scenes”:
Open adoc Studio
Navigate to the menu “adoc Studio > Settings > Product styles”
Select one of the styles, for example “Standard” and click on the plus symbol.
Select the new style and right-click on “Show in Finder”
In the Finder, right-click on “Show package contents”
Here you will now find the 3 components mentioned above. The info.json file is directly visible, the style.css file can be found in the “resources” folder. You can open both documents, for example with a text editor of your choice.
Depending on the duplicated style, you will see the corresponding style.css file, which contains all the design details of your document. We won't provide a complete CSS tutorial right now. There are already excellent resources for this. If you would like to learn more, the W3 School offers a comprehensive CSS course including an exercise editor.
Study the structure and definitions in the files to understand how different elements are designed. We encourage you to try out the style.css file. You can't break anything. In the worst case, duplicate the product style you used as a base and start again. It is only important that you do not change the base style. This is in a different location and need not concern us any further here.
Create your own Stylesheet
In the following, we will create our own style by duplicating an existing style and customizing it to our liking. A short recap from the first chapter:
1. Duplicate an Existing Style
A) Open adoc Studio and navigate to the settings: Go to “Settings” > “Product styles”.
B) Select a starting style:Decide on a style that comes closest to your desired end result. For example, the “Standard” style.
C) Duplicate style:Select the desired style and click on the plus symbol or (via the icon with the 3 dots) on “Duplicate”. Now give your new style a unique name, e.g. “My individual style”.
2. Edit Style Files

Once you have created a new style, you can edit its files to make adjustments.
A) Find style folder:
Call up the style folder via the settings (“adoc Studio > Settings > Product styles”). Select the duplicated style here and click on “Show in Finder”.
B) Open files:
Open the style.css and info.json files with your preferred text editor.
C) Customize info.json:
The info.json file provides the following metadata about your style:
idAn identification number that is unique. It is generated automatically when you create a new style.nameHere you can change the name of the style that will later be displayed in the product style selectionbasedOnSpecifies which base style is to be usedisHiddenSpecifies whether the style should be displayed in the product styles or not

D) Edit style.css:
In style.css, you can customize all CSS properties as you wish. Change fonts, colors, spacing and other style elements to achieve the desired appearance. Use CSS selectors to style specific elements of your document.
Example: To change the main font, you can edit or add the body element:
body {
    font-family: 'Your-Font', sans-serif;
    font-size: 16px;
    color: #333333;
}
3. Display Changes in adoc Studio
After each customization, save the style.css and info.json files. Switch back to adoc Studio. Open your document and select your newly created style under “Product styles”. Check the preview to see how your customizations look, both for HTML and PDF output.
CSS Tips & Tricks
Now it's up to you. Using two examples, we will show you how to add or customize CSS elements in adoc Studio.
Adding Fonts

Fonts are saved locally. If you would like to include a special font in your document that is not available as standard, it is advisable to store it in the product style in adoc Studio. This way, you only need to send the style file so that the recipient sees the document exactly as you have designed it.
1. Add fonts to the Style Folder:
Create a subfolder called fonts in the style folder. Add the desired font files (e.g. .ttf or .otf) to this folder.
2. Include Fonts in style.css:
Use the @font-face rule to define the fonts:
@font-face {
    font-family: 'IhreSchriftart';
    src: url('fonts/IhreSchriftart.ttf') format('truetype');
    font-weight: normal;
    font-style: normal;
}
3. Use Fonts:
Use the newly defined font in your CSS selectors:
h1, h2, h3 {
    font-family: 'IhreSchriftart', sans-serif;
}
Customizing Color Schemes

Another important aspect of the documentation is compliance with the corporate identity. The right colors must be chosen so that the document matches the brand. Here are some tips to effectively incorporate colors into the product style.
1. Define Color Variables:
Define color variables at the beginning of your style.css for a consistent color palette:
:root {
    --primary-color: #0055a5;
    --secondary-color: #ffd700;
    --text-color: #333333;
    --background-color: #ffffff;
}
2. Use Color Variables:
Use these variables in your CSS to assign colors:
body {
    background-color: var(--background-color);
    color: var(--text-color);
}
a {
    color: var(--primary-color);
}
a:hover {
    color: var(--secondary-color);
}
3. Easy Adjustments:
By changing the values of the variables, you can quickly adjust the entire color scheme of your document.
Best Practices
Incremental changes: Make changes step by step and regularly check the effects in the preview.
Version control: Use a version control system like Git to track your style changes and roll them back if necessary.
Use documentation: Consult the official CSS and AsciiDoc documentation for detailed information and advanced techniques.
Test compatibility: Make sure your styles display correctly in both HTML and PDF output.
Troubleshooting: Use your browser's developer tools to identify and fix CSS issues.
Reusability: Structure your styles so that they can be easily applied to different projects and adapted as needed.
Conclusion
Creating your own styles in adoc Studio gives you the opportunity to design your documentation in a personalized and professional way. With a little CSS knowledge and an understanding of adoc Studio's style structure, you can customize the look and feel of your documents to ensure a consistent and appealing appearance. Use the flexibility of adoc Studio to take your technical documentation to the next level.
Good luck with the design of your individual styles!


